

Ahoy, Admirals!
In the wake of the previous Development Diaries on Damage, Attack actions, and Short Range Squadrons, the studio’s David Guymer will be walking (or rather, steering) you through another equally integral part of the new edition of Dystopian Wars. The Movement Step.
Full Speed Ahead

David: “A game of Dystopian Wars is as much about clever positioning as it is about firepower. Whether it's manoeuvring your Destroyers around an island to come astern at a mighty Battleship, winding your Frigates around a dangerous Minefield, or setting up your models for a devastating Broadside action, movement is critical. So, how does it work?
All models in Dystopian Wars (excluding things like Platforms, of course) have a Maximum Speed rating on their Unit Profile. We will unveil some of our new-look Unit Profiles in a later blog, but for now, you'll just have to imagine it. As you may have already guessed, Maximum Speed is the furthest distance in inches that a model can move when making a manoeuvre. However, this isn’t the first movement a ship makes in a turn.
Models also have a Minimum Speed rating. This is a new addition to Dystopian Wars, but veterans of the old edition will recognise this as the spiritual successor of the old Drift rule. To represent huge, ungainly warships moving over choppy waters, models must always move the full distance of their Minimum Speed before performing any additional manoeuvres, so be careful where you park your ship.
Keeping it Together
Another important consideration when moving your models is Coherency. Most of your ships in Dystopian Wars take to the high seas in units of multiple models. These have to remain within 4” of one another in order to operate most effectively and to avoid incurring Disorder (for more on how Disorder can affect your ships, see our previous Development Diary entry). What’s more, any unit that starts and ends its Movement Step Out of Coherency is considered to be Abandoned and automatically removed from play.
So, you see, it is vital to consider your moves before making them. Forward planning is key. All it takes is one moment of inattention, a failure to consider what the other models in your or your opponent’s Fleets are up to, and you could find your ships separated, in the firing line, or on a collision course with a piece of Terrain.
This is particularly the case for those cherished Battleships. They may be bristling with guns and boasting a daunting Armour rating, but their awe-inspiring Mass usually translates to a very high Minimum Speed and a correspondingly sluggish Turn Limit.
So, if you find your centrepiece Ice Maiden Dreadnaught Super-Carrier (Minimum Speed: 4”; Turn Limit: 1) with an iceberg dead ahead, you had better start turning early!
Turn Limit? What’s That?
In case you hadn’t noticed, we like to keep things streamlined and intuitive here at Warcradle. It probably won’t surprise you then to learn that a model’s Turn Limit rating is the number of times that model can turn. It works as follows:
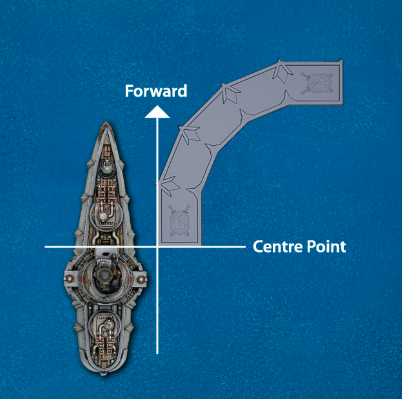
A model can change its heading by Coming About. It can usually only do this once, after it has moved its Minimum Speed.
When Coming About, you place the Turning Template against the centre point of your model. Then, you slide the centre point of your model around the Turning Template to the first Navigation Point (those are the six pointy bits sticking out of the Template at intervals). You reposition your model so it’s sitting flush against the next Segment (the straight bit!) and either end your Coming About there, or repeat the process by moving onto the next Navigation Point, up to the model’s Turn Limit.
The Turning Template

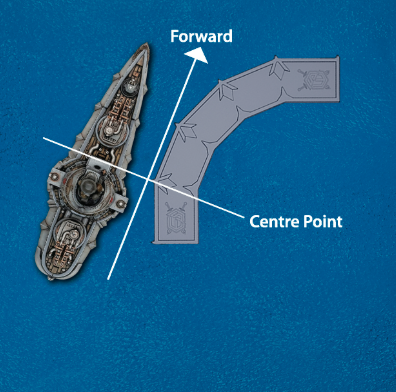
A Turning Template is made up of five straight Segments, each of which has a Navigation Point at either end. So the lumbering Ice Maiden we mentioned earlier could only move to the first Navigation Point, but the Schaumburg Escort Cruiser attached to it, with a Turn Limit of 2, could move to the second Point.
You can Come About at any point during your move, and continue to move afterwards, but each step around the Turning Template, above, counts as 1” against your Maximum Speed.
A Two-Turn Limit Just Isn’t Enough!
We’ve all been there. Big units get snarled up around Objectives. Magnetic Generators drag Minefields into your units’ path, and Commonwealth cryo weapons freeze the very sea around them. In such desperate cases, a model can perform an Emergency Manoeuvre, allowing it to Come About a second, or even a third time. However, each time they do so, they will accrue a level of Disorder. If you find yourself in a really tight spot, you may even engage Full Reverse. I’m going to trust you to work out that one for yourselves. This reduces your Minimum Speed to 0, but also halves your Maximum Speed and incurs (you guessed it) a level of Disorder.
Now, if your models are in this situation to begin with, then it's quite likely that they are in a bad place anyway. Chances are they have already collided with something, or are in such close Proximity to something that hitting it is inevitable without drastic measures. They are probably already labouring under one or more levels of Disorder as a consequence, and additional levels of Disorder not only incur harsher penalties, but take longer to clear as well.
Emergency Manoeuvres are far from cost-free solutions to poor planning. Of course, there are times when everything goes wrong (or, for a certain type of Commonwealth or Imperium Admiral, very, very right) and your ships are going to hit things.
Join me another time and we ‘ll take a closer look at what this really means: Collisions and Ramming!”
David Guymer